Learning to program and building an engineering tool
Early Steps
I’ve always been somewhat interested in programming. Maybe it’s because I got my first computer at a very young age. Though it took me a long time to actually pick up a programming language. I tried in my early and even late teens, but the concepts quickly became too much for me to understand. Only when I was doing my bachelor’s degree, I picked up a Python basics course and formed a basic understanding in what programming really involves.
How Poka Yoke Led Me to Code
I was doing an internship at a car factory. I worked in the process planning department, where assembly and logistics layouts, and the assembly procedures were planned and optimized. My job was to invent “Poka Yoke-solutions” to individual assembly stations. Poka Yoke means ‘mistake proofing’, in the sense that the assembly environment, tools and other related things (like the product itself) are designed such that human error cannot be made. For example, alignment pins that prohibit assembly in wrong orientations.
A relatively simple method of soft* Poka Yoke is a pick-to-light, or pick-by-light system. This is a system where the parameters of the individual product are read, and lights in correct bins turn on to signify where the assembly worker should pick the correct parts. The company did not have such a system, because implementation was deemed too expensive, even though human error was frequent and costly.
*Soft Poka Yoke means not quite mistake proofing but mistake prevention.
I took it as my pet project to try to figure out how a system like that could be implemented on the cheap, as a proof of concept. With the help of colleagues, I got my hands on a Raspberry Pi mini computer, some LEDs and wires. I first simply began working out how to make the LEDs light up, but as the summer progressed, my program got increasingly functional. I can’t say ‘sophisticated’, since it was a hot mess due to my inability to write nice code. In the end I had a system that connected to the ‘product information server’ (it’s really not called that but this gives the right idea), scraped the information on the page and made the right LED blink. This was achieved with the hardware cost of around 100 € and under 300 lines of code, which was orders of magnitude less than the original estimates.
Back to Python
For some reason, I didn’t give Python a second thought for a long time. I spent another year in school and two years at work, and only in my second semester of university I picked it up again. This time it’s because we’re having a course in machine learning and I thought I have to teach myself to code again to survive the course, but it happened that we’re only doing cute stuff.
Even though relearning how to write code turned out to be unnecessary for schoolwork, I rediscovered how entertaining it actually can be, and started to use Python for a lot of things. It proved useful in doing calculations and plotting data. Alongside Python I learned to write LaTeX because of its powerful math editing capabilities. Now I almost prefer LaTeX over pen and paper when it comes to doing math.
Building an Engineering Tool
I was eager to jump away from simple programming homework-type tasks and go into a bigger project. Since User Interface (UI) development has always interested me, I decided to start working on an engineering app that would help with calculations that I encountered often in my work as a design engineer. I figured I’d first build applets for separate things and then later join them into a whole ensemble. I started with a screw connection helper.
As of writing I’m not sure, but I think I will update this blog post as the project moves forward.
The programming language I chose to use was of course Python, since that’s basically the only programming language I know. After some quick searching, I decided I will make at least the first version of my app with the default Tkinter library. I thought that would give me a good understanding in UI development, and that mastering Tkinter would allow me to move to different, more involved UI development tools later. Before any programming though, I had to make a plan for my first applet.
As said earlier, I decided on a screw connection helper app. I had to make a plan: what does the app need and how should it look? I first started thinking about what goes into designing a screw connection and made a list of all the different parameters such as load cases and design principles. I first thought that I’d include things like the ‘assembly clearance’, which would suggest the number of screws used for the connection. I later decided against these, since the logic would become too involved and that’s the designer’s job to decide anyway. The first parameters I ended up with were:
Torque load and bolt circle diameter
Axial load
Radial (shear) load
Pressure and flange area
Number of screws in connection
Environment variable (dry, wet, chooses the friction coefficient)
Screw grade
I also made a preliminary wireframe model so that I’d know roughly what I was aiming for in the beginning. I designed the layout in Affinity Designer, using a grid so that I could reference that when I was placing my widgets in code with the grid() method:
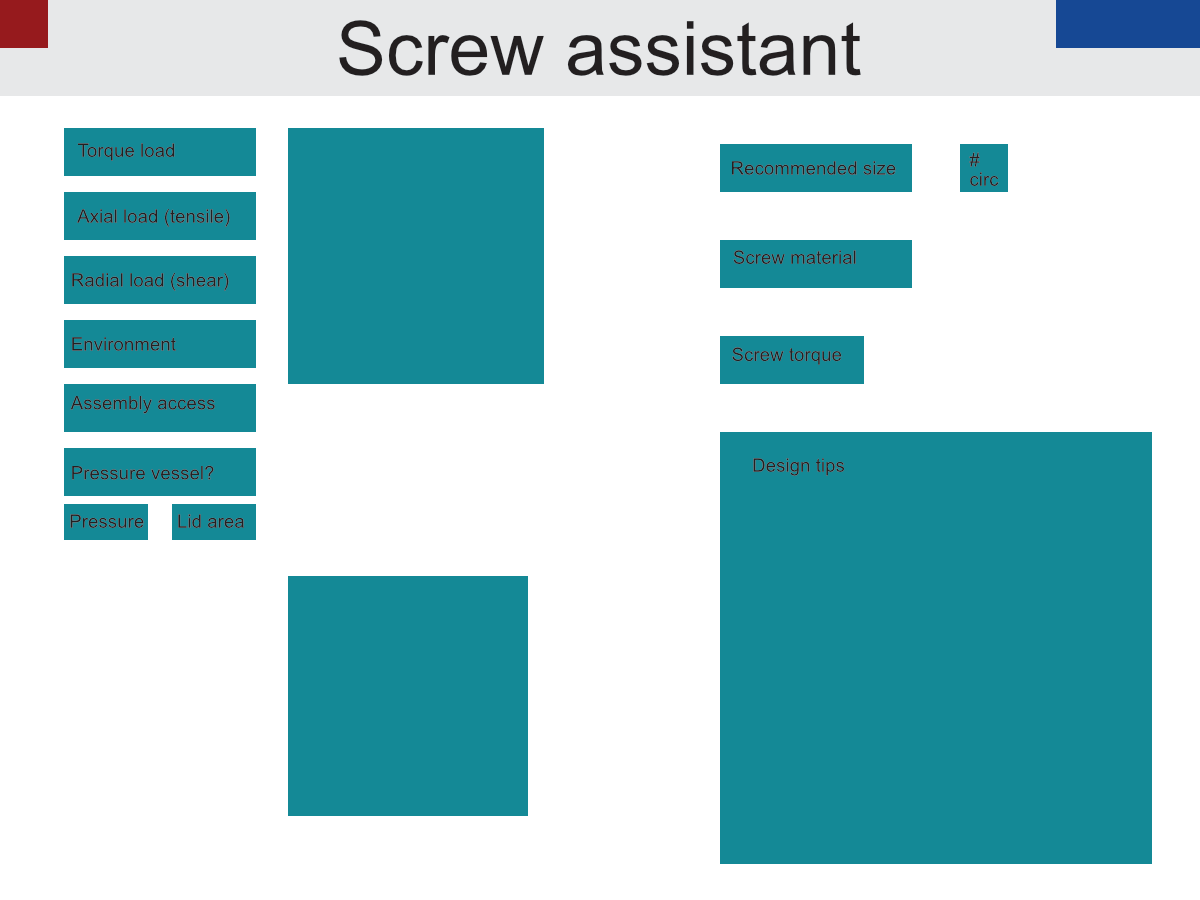
Preliminary design for the screw helper app.
Bringing the App to Life
Fortunately, the math involved in designing a basic screw connection is rather easy. That made the code also relatively easy to write. The biggest thing I struggled with was linking button functions with the several calculation methods, while maintaining readable code.
A snippet of the calculation methods:
def radialLimitForce(self, radialForce=None, frictioncoeff=None, screwAmount=None):
    '''Calculates the total axial force needed to arrest a radial (shear) load. Inputs are radial force, amount of screws and the friction coefficient.'''
    radialForce = float(radialForce)
    frictioncoeff = float(frictioncoeff)
    screwAmount = int(screwAmount)
    self.forcePerBolt = radialForce/frictioncoeff/screwAmount
    return self.forcePerBolt

def axialLimitForce(self, axialForce=None, screwAmount=None):
    '''Calculates the external force on one screw in the axial direction. Inputs are axial force, amount of screws.'''
    axialForce = float(axialForce)
    screwAmount = int(screwAmount)
    self.forcePerBolt = axialForce/screwAmount
    return self.forcePerBolt
Current Features
The app now works if you give it correct starting parameters. That is, I haven’t yet built in much exception handling, other than a tip label at the bottom that tells the user pretty much that ‘something’ went wrong. The app can now:
Calculate the total force for each screw in the system from the torque load and bolt circle parameters, the axial and radial load parameters, the pressure and flange area parameters, from initial O-ring seal compression parameters and the environment parameter. The total force is the sum of all of these.
Calculate the total stress for each screw in the system based on the total force.
Choose the smallest screw that would handle the loads based on chosen screw grade.
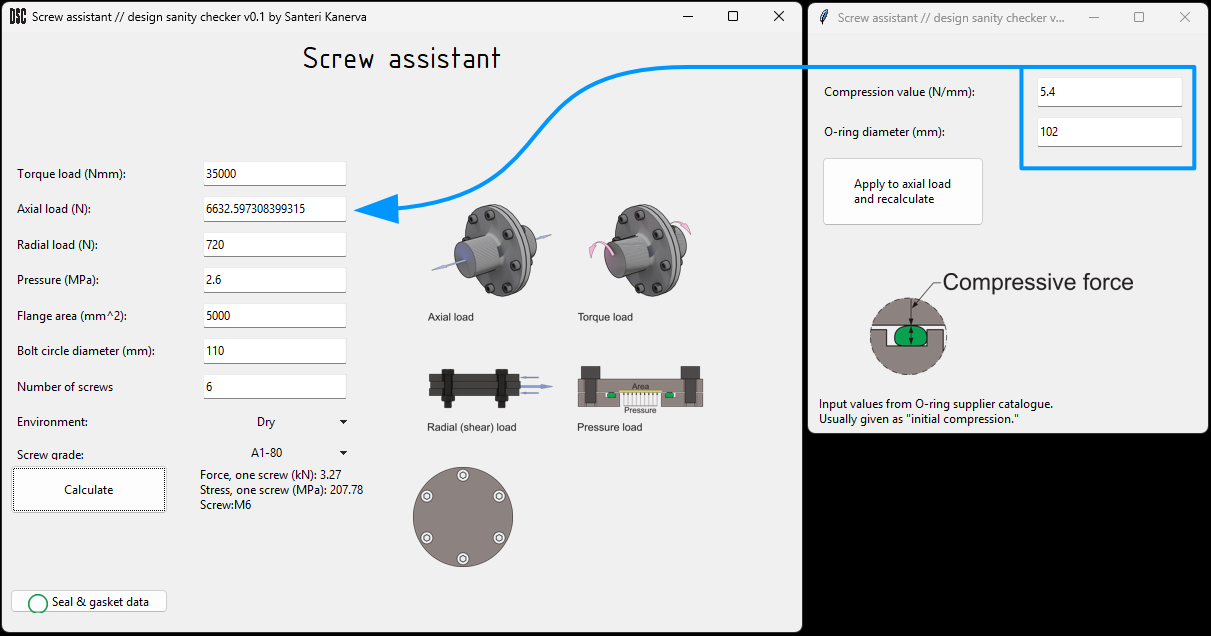
A look into the app UI. The app calculates the smallest screw that would manage the given loads. The O-ring page calculates forces generated by initial compression of seals and adds it to the input axial load value. The app outputs the force and stress per screw, and the smallest screw that fits the bill. The flange icon next to the results updates dynamically to display the chosen number of screws.
Future Plans
I don’t think I should add too many features anymore into this portion of my application. I think the next step is to finish the layout, make minor adjustments and start working on the next page. The next one will probably be something like strength of materials calculations, or a simple unit converter. I’ll keep you updated.